The DLMUP Settings tab:
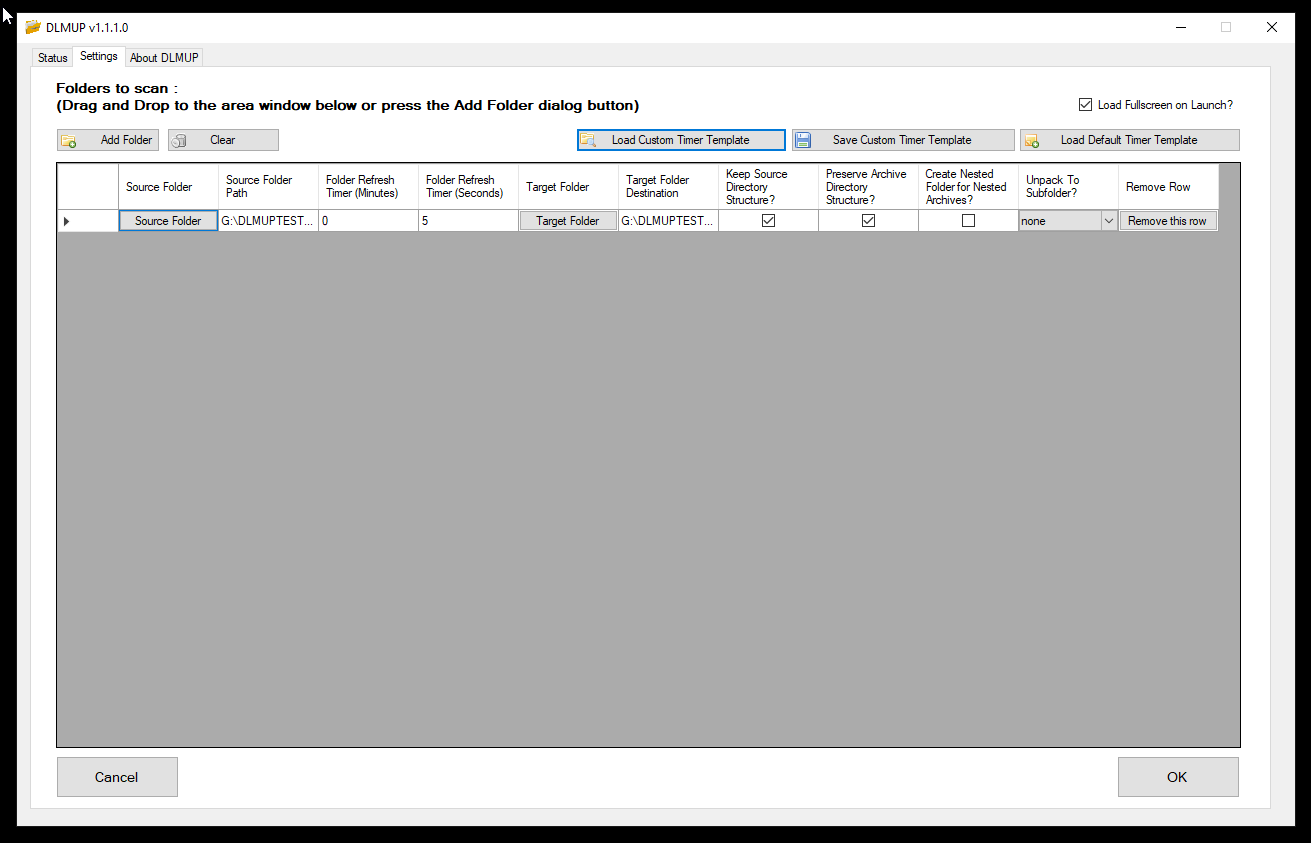
After installation, the first step is adding Timers from the DLMUP Settings control tab. You can do this by clicking on Add Folder, or by drag and dropping a folder or folders from Windows Explorer or another File Manager to the DataGridView area.
Please note that if DLMUP is run with Administrator priviledges, Windows Explorer or your other File Manager you are dragging from must have the same elevated priviledges (Administrator) to accept drag and drop.
The different settings for each Timer are as follows:
- Source Folder - This button will open an Open Folder Dialog to change the Source Folder Path to a directory you want to scan.
- Source Folder Path - The Source Folder details the directory (and it's sub folders) where archives will be scanned for on this timer.
- Folder Refresh Timer (Minutes) - By clicking on this cell, it will reveal a dropdown menu where you can set how many total minutes the Timer will reset it's scanning for in the Source Folder Path.
- Folder Refresh Timer (Seconds) - By clicking on this cell, it will reveal a dropdown menu where you can set how many total seconds (in addition to the Minutes) the Timer will reset it's scanning for in the Source Folder Path.
- Target Folder - This button will open an Open Folder Dialog to change the Target Folder Destination Path to a directory you want to unpack all archives found on this Timer to.
- Target Folder Path - This shows the Target Folder Destination the archives found in the Source Folder Path (and it's subdirectories) will be unpacked on this timer to.
- Keep Source Directory Structure? - This setting, when checked, will keep the source directory structure. So for example, if a source folder has an archive in: C:\1\2\3 and the target folder is: D:\Unpacked, it will unpack the archive into: D:\Unpacked\1\2\3.
- Preserve Archive Directory Structure? - This setting, when checked, will keep the archive directory structure of the archives it unpacks. If unticked, the archives unpacked will unpack all files found in the archive to the same folder.
- Create Folder For Nested Archives? - This setting, when checked, will detect if an archive has been found in a sub folder of where the parent archive is located, and create a new sub folder underneath the target folder and unpack that archives contents to there.
- Unpack To SubFolder? - This setting, when selected from the dropdown:
- None - Don't unpack any archives found in subfolders to a newly created subfolder.
- Archive - Any archives found in any subfolders create a new sub folder with that archives name as the sub folder name.
- Parent - Any archives found in any subfolders create a new sub folder with that parent folders name as the sub folder name.
- Showname - Any archives found in any subfolders create a new sub folder with the showname (just the name of the tv or movie, taken from the filename) as that sub folder name.
- Copy To Another Destination Folder if DLMUP Complete Found? - This checkbox setting once checked, enables the allows the user to unlock the next setting which specifies the source files to another target folder once the source files have been processed
- Destination Folder Path if DLMUP Complete Found? - By clicking on this button, the user can specify the target folder to copy the source folder contents to once the source files have been processed.
- Target Copy Folder - The Target Copy Folder details the directory where the files will optionally be copied to after extraction has been processed.
- Delete After Copy? - This setting, when selected from the dropdown:
- None - Don't delete the source folder after copy.
- DeleteAfterEachFileCopied - After each source file is copied to the target copy folder, it is deleted from the original source folder. After all the files have been copied over, it then deletes the source folder itself.
- DeleteAfterEachFolderCopied - Only after all the source files are copied to the target copy folder, it then deletes the source folder itself, any files and any sub folders inside that source folder.
- MoveToRecycleBin - Only after all the source files are copied to the target copy folder, it then moves those source files to the Recycle Bin.
- Remove this Row - Pressing this button will remove this Timer from your list of Timers in DLMUP. Warning: this action cannot be undone once it is pressed.
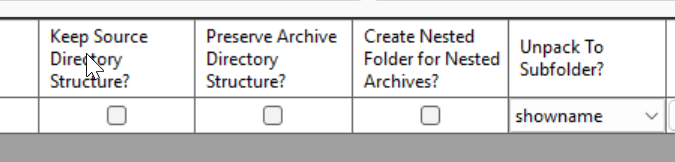
The settings shown above for Unpack to SubFolder - Showname option, will unpack a filename called: "TV.Show.Name.S01E01" on a timer with destination folder "C:\UNPACKTEST" to a folder path: "C:\UNPACKTEST\TV.Show.Name\".
IMPORTANT: The OK button will confirm the settings you have set on each Timer row you have configured, and will let you know if there are any issues found in those Timers before it can successfully accept them.
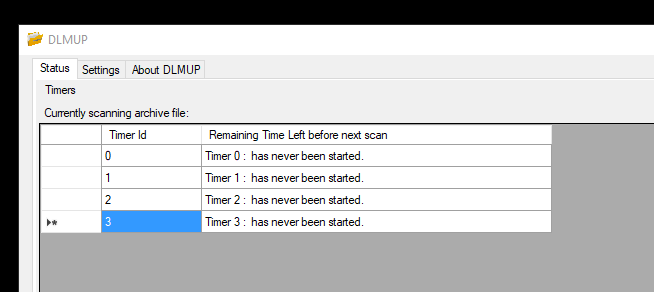
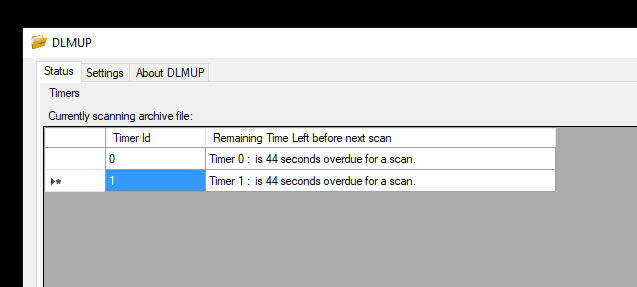
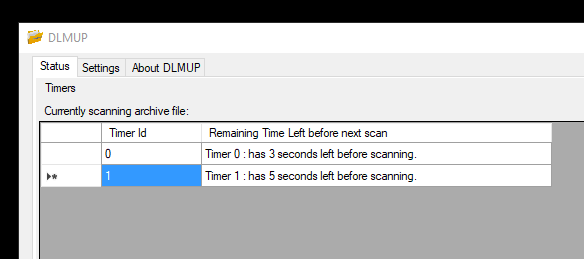
The DLMUP Status tab:
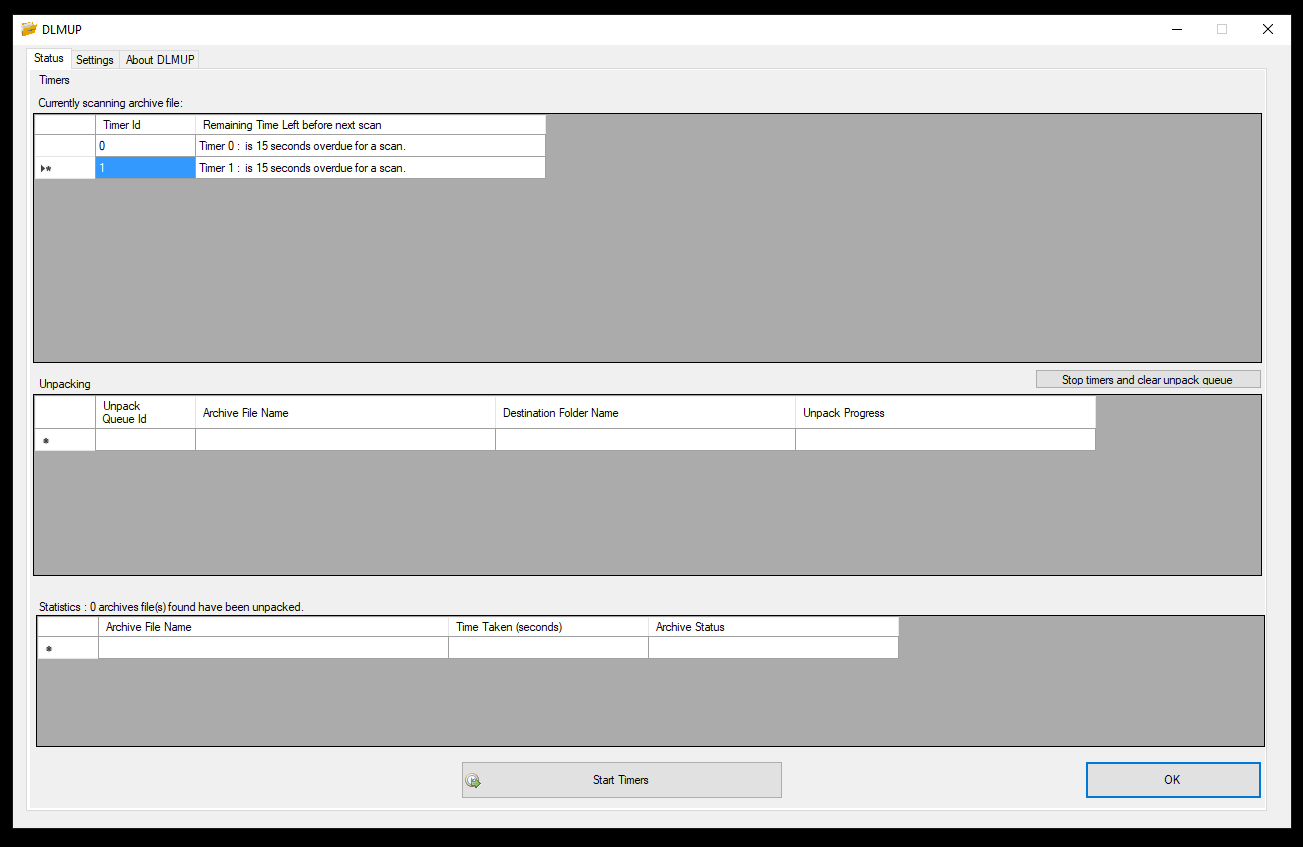
The Timer section shows all active Timers, and their status. This can range from having never been started, to having been started, but the Stop Timers button has been pressed (overdue for a scan), or Timers which are actively scanning, and are counting down to their next scan (time left before scanning).
The Unpacking section shows the Unpack Queue. DLMUP unpacks archives one at a time, and all archives found by the Timer will be added to here unless they have a DLMUP_Complete log file or a DLMUP_Bad log file in their archive directory. The Unpack Progress column shows the progress made in unpacking each archive.

The Statistics section shows all the details of the archives that have been unpacked successfully or unsuccesfully. It shows the Time Taken in seconds to unpack an archive, and the archive status (OK or BAD) with appropriate message if the archive was unpacked or encountered any errors.
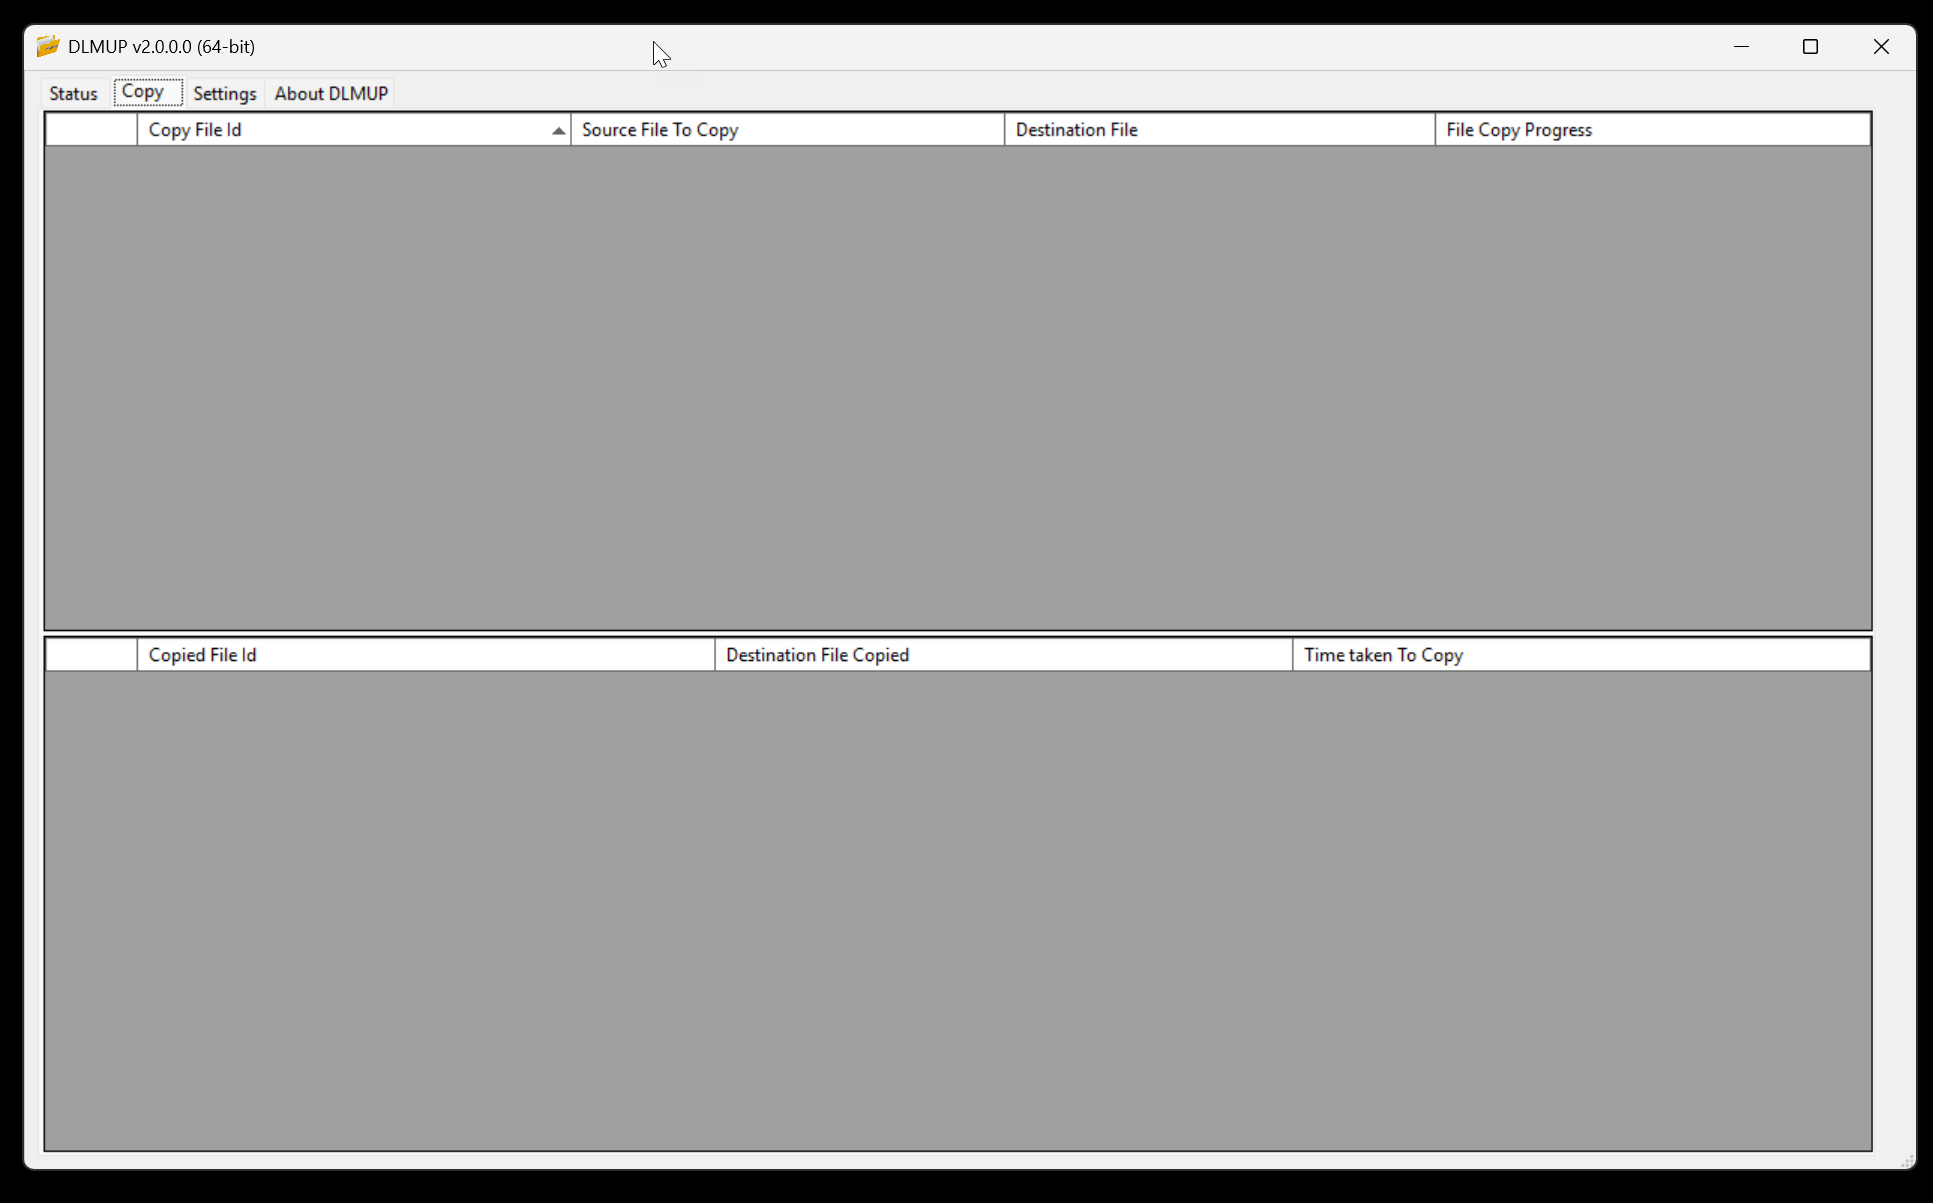
The DLMUP Copy tab:
Added in DLMUP version 2.0.0.0, the Copy tab shows all files in the copy queue that are yet to be copied or are being copied, and their copy progress status. Below that is another grid that shows all files that have completed their copying from the copy queue.